Showing posts with label diy. Show all posts

Friday, September 26, 2014

DIY: How To Make Birthday Centerpieces

Today at work, I had the task to recreate a My Little Pony Centerpiece using the items we had in the store.  I really thought it was going to be impossible.  We already printed out the pony that we needed but I had to cut out foam paper to stick it to and syrofoam to use as a base.  Here are some pictures to show you what I used and how I used it.

I cut out a piece of styrofoam from a block that we had in the store.   The easiest way for me was just to saw it off with scissors.


I used this aqua color border to wrap around the block.

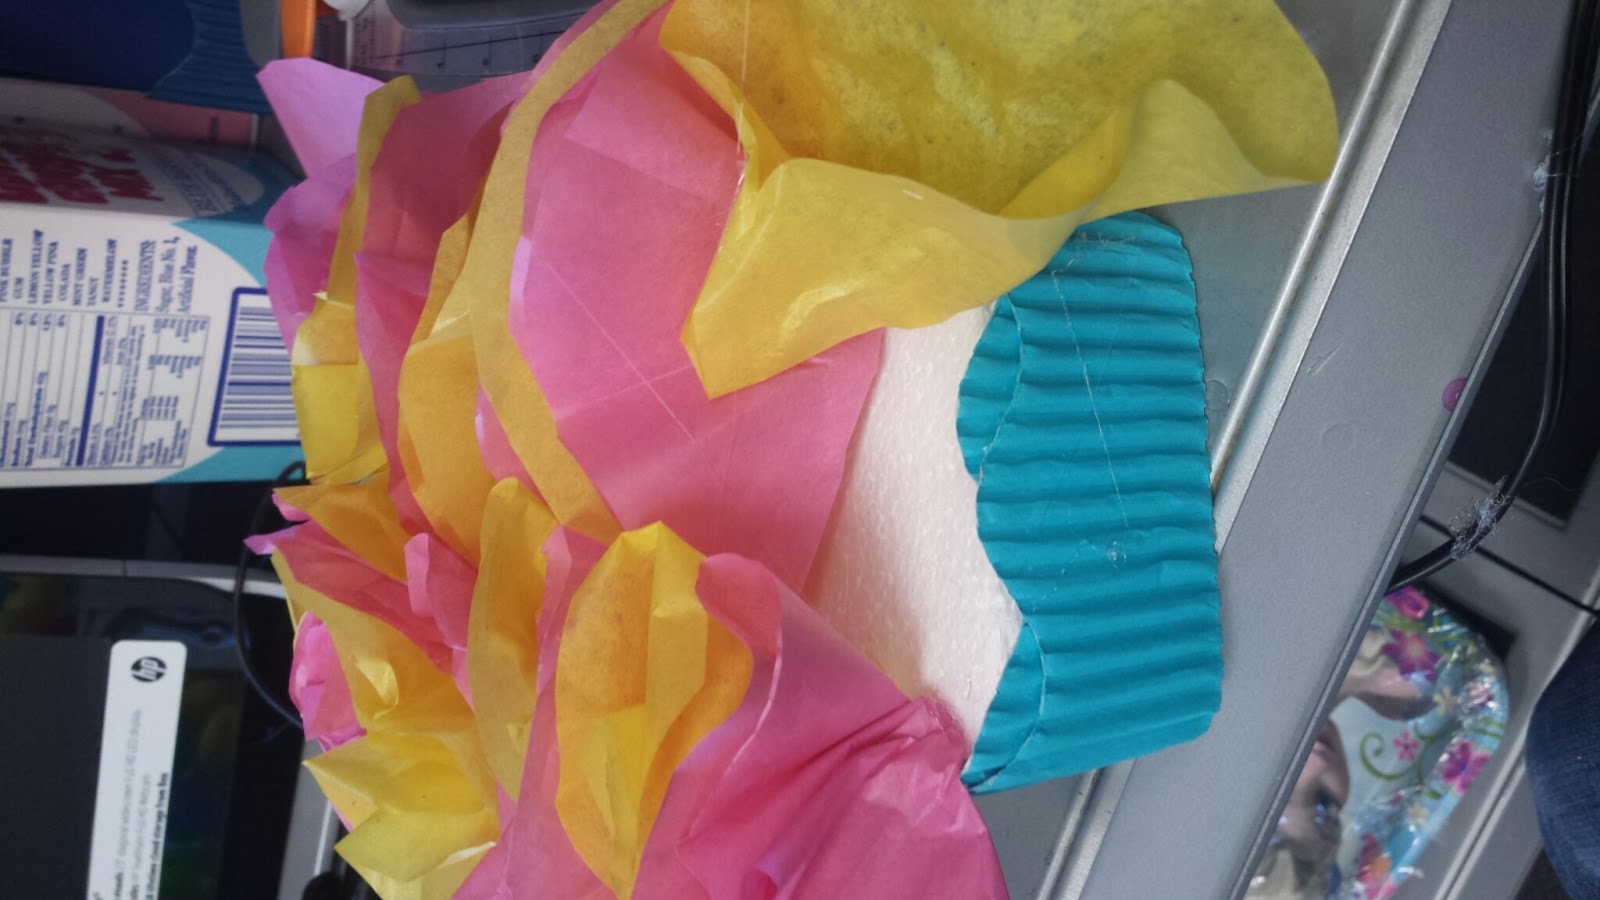
Since the border was scalloped it showed some of the white edges of the foam.  I wrapped the border around the foam 3 times to hide the top white edges

This was the result. I liked the finished look of doing that.

I used a total of 6 sheets of each color to complete 2 centerpieces.  I  folded the tissue paper about 4 times and traced a circle using the border that was still in the roll.

As you can see, the circles are as wide as the base, which is what you want  because it makes it look more fluffier.

I used pink and yellow tissue paper.

Before you start gluing the tissue paper, poke a hole in the center of the foam.  This is where your character will be placed.

I used a Sharpie to give me a bigger fluff. You can use a pencil but the fluff will be much tighter.

Add hot glue to the bottom tip of the paper and stick it to the base

Just follow around the edge of the foam until you are back to the beginning . The first few pieces might look weird but that's normal.  It will look pretty once you finish.

This is the finished result

I had to use adhesived foam paper, so there was no room to make mistakes. We only had 2 prints of the pony and we needed 2 centerpieces.

I wrapped a plastic balloon stick with ribbon to make it look cuter

I then hot glued the stick to the pony 

I put hot glue in the hole that I made earlier and stuck the stick in there.  I put more hot glue around the base of the straw and held it in place until it dried to avoid a crooked centerpiece

After the glue is dry, simply glue about 4-6 more tissue paper to cover up the center.

And...this is the finished result.  

The one in the right was the one I used to copy from.  The person who made that one used a piece of  wood as the base.  She also had wider unscalloped border which she wrapped only once around the wood.  Instead of using foam paper she used Styrofoam.

You can use any character you want to use and any color.  For example you can use black border and red and blue tissue paper for a Spiderman theme. These are cute to use at birthday centerpieces for the  tables. If time allows make enough for each guest to take home as a small thank you for coming to the party.

Thursday, May 1, 2014

New Phone Cases from Mini in the Box


MY DIY Galaxy inspired for case. I attempted to paint my plastic hard phone case after watching a YouTube video. Mine looked nothing like the galaxy showed on the video

I have been in dire need of a new cell phone case for about 4 months. I finally decided to order some from
http://www.miniinthebox.com/
 You can find all types of cases and accessories from this website.
This case only cost $2.99

It's a soft case and fits snugly around my Galaxy S4

It also has a slight shimmer to the case. I think its adorable especially because I love owls 

This is how it looks on my phone

This one is a Cassette Pattern Silicone Soft Case this was also $2.99

This one bends more

It also came with a screen protector. The owl case did not come with one.

Give you easy directions to follow to apply the protector


This is the back side of the phone. I love the whole retro look it gives my phone and I love that it comes in purple my favorite color ( different colors are available)


 Mini In the Box  is my favorite place to shop for my phone accessories. They have plenty of phone cases for Apple and Samsung. They also carry home accessories and a bunch of other fun stuff. You definitely have to visit their website. I place my order on 4/12/14 and it came in today which is 5/1/14. Not to bad considering that it came in from Hong Kong. They also have an affiliate program available. This is my second time purchasing from this website and I already have a $3.00 credit.
Thanks for stopping by.
XoXo
Christina

Monday, December 9, 2013

DIY Deco Mesh Wreath-Pictorial


Supplies Needed:
Wire Wreath-Michael s or Hobby Lobby
Pipe Cleaners unless you buy a wreath with the pipe cleaners already attached (hobby lobby)
20" Deco Mesh
Accent Deco Mesh (I think its 12")
Twigs/Picks/Letters or anything else you want to attach


Metal wreath can be bought at Mitchael's.They had 3 sizes when I went. I choose the medium size. I saw some at Hobby Lobby today in the Christmas ribbon isle with the pipe cleaners already attached to it.

You will need pipe cleaners cut in half.  Wrap a pipe cleaner in the 2 middle wires where there is a notch

After you wrap each notch, tie a pipe cleaner between the notches in the top 2 wires
see nest picture


Now you are ready to wrap your wreath.
Starting with the middle  pipe cleaners, tie a few inches of the beginning of the mesh like above picture
REMEMBER YOU ARE WORKING WITH THE PIPE CLEANERS IN THE CENTER WHERE THE NOTCHES ARE

I measured the length of my tablet (about 8 inches) then scrunched it up loosely and tied it with the pipe cleaner

make sure you measure the same with each notch

Continue around entire Center Notches

DO NOT CUT MESH
Don't worry if it looks to spacey.You are doing a good job


Now you will work with the top pipe cleaners
Do the exact same thing as you did during the first round. Same measurements of mesh.

After each pipe cleaner has mesh tied on it you can now cut it off. Leave a few inches to tuck behind the wreath


now get the smaller roll of Deco Mesh

You will now do One round of the accent deco mesh. Start at the beginning of the wreath on the center pipe cleaner and tie  the mesh to it. Then bring it up and tie some mesh to the top pipe cleaner. LOOK AT ABOVE PICTURE

Continue this pattern until you complete one round. Remember center,top,center, top patter all the way around.
Cut the mesh and tuck main color mesh and accent mesh to the back of wreath.

I placed 3 picks where I  noticed a few gaps


I hot glued them to the back of the wreath

I painted a wooded "P" that I bought from Hobby Lobby and hot glued it to the mesh


This is the finished look for all less than $10.00
 I hope this helps. Please follow my blog for more DIY's and product reviews

xoxo
Christina