Sunday, December 16, 2012

Teenage Mutant Ninja Party

 
My son's birthday theme was Teenage Mutant Ninja Turtles. I looked everywhere for TMNT theme party supplies but there was nothing. EBay only had the older TMNT birthday supplies and my son wanted the newer version. New shows come on Saturday mornings on Nick Jr at 10:00 am
I found a few cute ideas on
Pinterest and Etsy. I had a budget to keep so I made everything myself except for the cake. Here are the links I used to get my ideas:
http://pinterest.com/pin/284360163941851547/
http://pinterest.com/pin/117234396519496189/


I chose to get the smaller sized gift bags. I found these at Hobby Lobby for $3.99 and of course I used the 40% off coupon.


At Hobby Lobby, I also bought  2 big package of foam paper. It came out cheaper to buy the big package rather than individual sheets. I had a TMNT mask from my sons Halloween costume and traced it on regular white paper and just trimmed it to fit the small gift bags. Once I had the perfect size I cut the face  and cut eye mask out using the colors of orange, blue, purple, and red. I hot glued googly eyes to them to make them look cuter.


I saw this one on Pinterest. I bought foam balls. These balls where cheaper than the Styrofoam balls. Hobby Lobby has them cheaper than Michael's too. These balls are a smoother foam. I cut them in half with and exacto knife then used a paring knife to cut all the way through.


I used the color Festive Green to paint the balls. I used 3 coats and let each coat dry before applying the next coat. 1 small bottle will do 12 medium sized balls or 24 halves.


These are the finished bags. I filled each with candy and a small playdoh and mold.


I cut a strip of a felt sheet to make the mask. I also glued googly eyes but these eyes were way too small. Off to Hobby Lobby I went to get a bigger size. These tiny eyes would be cute for nail art if your nails were long enough:) I think these eye size are 14mm. The ones I used for the goodie bags were 8mm.


When I registered my email to the TMNT Nick Jr. website they sent me a template for the mask. Luckily I saved it and used it to make these party mask. I was wondering why I couldn't see through them. It was driving me nuts. I kept cutting the eye hole bigger but I was ruining the look of the mask my doing so. I cut 11" of thin elastic and hot glued them to the mask. 1 small package will do about 15 mask.


Finally my lil super hero came home from school to save the day! He showed me the right way to put on the mask. Finally I could see!!☺


After finding the right size, which I believe is 10mm, this is what my little turtles look like♥


Here are the mask.


So I was going to make cake pops to put on top of my turtles. I remember making cake pops last year and they were so good. Unfortunately the cake pops I made this time were so not good. I had already poked holes into all the tops of the turtle and did not want to leave them like that. They were too cute to not display so I went to the store and bought big LaffyTaffy candy sticks and big PixySticks and tied them to the lollipop sticks and put them on top of the turtles. I also typed out a small "Thank You" note and taped it to the top of the candies


This is my Alex. I am so thankful for him. We had his birthday party at his Taekwondo School.


This is the mask I used to trace the face. I wish I had a scanner to put the templates on here but I dont have one:(


These are my nails.
Sinful Colors: Irish Green-green
Sally Hansen: Cherry Red-red
Nina Ultra Pro: Blue Blaze-blue
China Glaze:Papaya Punch-orange
China Glaze:Spontaneous-purple


Wednesday, November 28, 2012

COVERGIRL Blastflipstick BzzCampaign-Pictures


Pretty box that my BzzKit came in. I have been waiting all morning for the mailman to come.
www.bzzagent.com
I am a Bzzagent and I received this product for free to test and reveiw.


Contains:
1. Official BzzGuide
2. 3 Covergirl blastflipsticks
 

The Beautiful Sofia Vergara
Covergirl Spokes Woman
 

Shimmery Shades
 

Creamy Bold Colors
 

Bold Color-Bright Pink
Shimmery  Gold Shade


STUNNER: Bright pink and gold shades
Gold Shimmery Shade

Deep Brown Bold Color


MINX: Deep brown and gold shades


Burgundy Bold Color
Pearl Pink Shimmery Shade


VIXEN-Burgundy and Pearl Pink Shade

 
Whats the Bzz: Dual Blended Lipstick that is blendable and endless kissable shades. One end is a creamy bold color and the other end is a shimmery shade. Apply the shimmery end all over your lips or in the center.
 
Just the Facts: Very blendable. I applied the shimmery shade over my lips quite a few times to get the color that I wanted. It did not clump or fill thick. You can create on "ombre" look on you lips. Very trendy!  Created by expert make-up artist and COVERGIRL Global Creative Design Director Pat McGrath. COVERGIRL blastflipsticks come in 13 colorful shades. You can find them at grocery stores,drug stores and major retailers for about $8.49. Do you want to see all the shades they come in? Visit www.covergirl.com or facebook.com/covergirl to check the 13 shades out.
 
The Inside Scoop: Glide on the creamy end of the stick and layer and blend the shimmery end until you have your perfect one of a kind color.


Posted by Picasa

More Christmas DIY

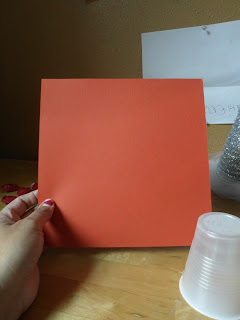
Instead of buying a foam cone from the craft store you can make your own. Just grab a paper or plastic cup to use as the base and card stock paper. I saw this on a Pinterest link:
http://spunkyjunky.blogspot.com/2010/11/tutorial-tuesday-tissue-paper-christmas.html


I did not take a picture of this but before I wrapped my tree with the silver tinsel, I wrapped it around with aluminum foil. I used a hot glue gun to glue the tinsel.


I used 2 mini tinsels and each cost $1.00. I still have plenty left over tinsel for another project. I already had a roll of tulle in my craft box. Total cost for this project: $2.00
 
I wanted to make another tree using red glitter. This time I used a smaller cup and red card stock


This tree actually came out a little bit better. Fill in any gaps with scraps of remaining card stock


Don't worry about the seams because they will be hidden


Modpodge, glitter, shoebox lid, spoon and foam brush is all you need.


This is my second layer of glitter I am adding.
Again I forgot to take picture of the first steps:/
I applied modpodge all over the tree with the foam brush. I spooned glitter all over the tree. I let it set for about 3 minutes. I applied more modpodge over the glitter but this time a little bit more thicker ( as you can see in the picture). Lastly, I added more glitter. Set aside to dry. Don't forget to pour the remaining glitter back into the bottle.Very little glitter is actually used for this project. I don't even think I used 1/4 of the bottle. I should have checked my craft bag before I left to the store. I had a jar of red,green and silver glitter in there.
Total cost of this project: $1.47 for the glitter


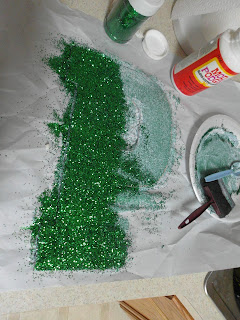
Hobby Lobby had a sale on their unfinished wooded letters so I bought the letter "P" and green glitter.


I made quite a mess with the red tree and decided to try glittering it another way. Note to self: Don't Modpodge on top of paper, project will stick to it.


I applied a thin coat of Modpodge all over the letter. I poured modpodge on a plate and mixed the glitter into it. It looked really thick and clumpy. I did not think it was going to work. I grabbed my foam brush and started painting it on and it applied very nicely.


I really wanted to make sure that the green was going to show so poured more glitter on top of it.
Total cost:$3.00 for letter and glitter


These are my DIY's  for right now. If I do more I will post them.
 
All I need to do is add a few more things and it will look complete.

If you look hard enough you probably have everything you need for these crafts in your home. Thanks for stopping by♥